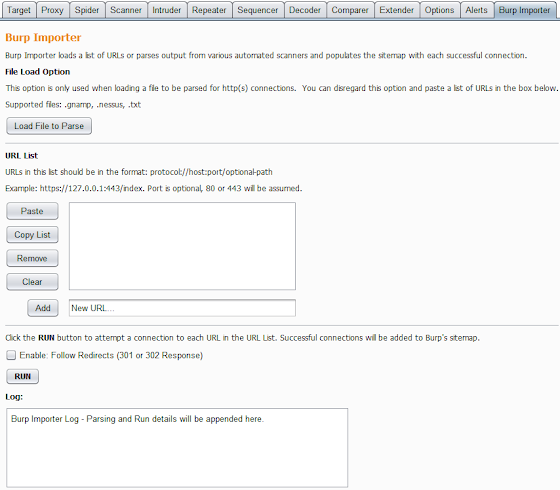
Burp Importer is a Burp Suite extension written in python which allows users to connect to a list of web servers and populate the sitemap with successful connections. Burp Importer also has the ability to parse Nessus (.nessus), Nmap (.gnmap), or a text file for potential web connections. Have you ever wished you could use Burp’s Intruder to hit multiple targets at once for discovery purposes? Now you can with the Burp Import extension. Use cases for this extension consist of web server discovery, authorization testing, and more!

Installing
- Download Jython standalone Jar: http://www.jython.org/downloads.html
- In the Extender>Options tab point your Python Environment to the Jython file.
- Add Burp Importer in the Extender>Extensions tab.
General Use
Burp Importer is easy to use as it’s fairly similar to Burp’s Intruder tool. The first section of the extension is the file load option which is optional and used to parse Nessus (.nessus), Nmap (.gnmap), or a list of newline separated URLs (.txt). Nessus files are parsed for the HTTP Information Plugin (ID 24260). Nmap files are parsed for open common web ports from a predefined dictionary. Text files should be a list of URLs which conform to the java.net.URL format and separated by a newline. After the files are parsed a list of generated URLs will be added to the URL List box.

The URL List section is almost identical to Burp Intruder’s Payload Options. Users have the ability to paste a list of URLs, copy the current list, remove a URL from the list, clear the entire list, or add an individual URL. A connection to each item in the list will be attempted using the java.net.URL class and Burp makeHttpRequest method.
Gnamp file parsed example:

Nessus file parsed example:

The last section of the extension provides the user a checkbox option to follow redirects, run the list of URLs, and a run log. Redirects are determined by 301 and 302 status codes and based on the ‘Location’ header in the response. The run log displays the same output which shows in the Extender>Extensions>Output tab. It shows basic data any time you run the URL list such as successful connections, number of redirects (if enabled), and a list of URLs which are malformed or have connectivity issues.
Running a list of hosts:

Items imported into the sitemap:

Use Case – Discovery
One of the main motivations for creating this extension was to help the discovery phase of an application or network penetration test. Parsing through network or vulnerability scan results can be tedious and inefficient which is why automation is a vital part of penetration testing. This extension can be utilized as just a file parser which generates valid URLs to use with other tools and can also be used to gain quick insight into the web application scope of a network. There are many ways to utilize this tool from a discovery perspective, which include:
- Determine the web scope of an environment via successful connections added to the sitemap.
- Search or scrape for certain information from multiple sites. An example of this would be searching multiple sites for e-mail addresses or other specific information.
- Determine the low-level vulnerability posture of multiple sites or pages via spidering then passive or active scanning.
Use Case – Authorization Testing
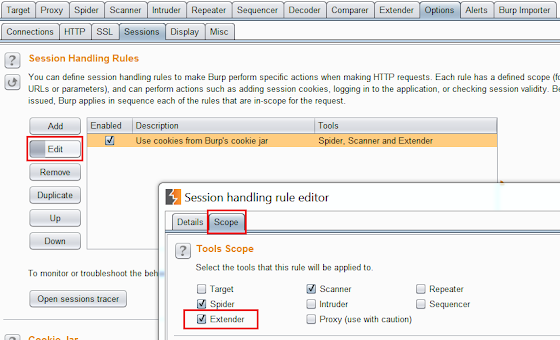
Another way to use this extension is to check an application for insecure direct object references. This refers to restricting objects or pages only to users who are authorized. To do this requires at least one set of valid credentials or potentially more depending on how many user roles are being tested. Also, session handling rules must be set to use cookies from Burp’s cookie jar with Extender.

The following steps can then be performed:
- Authenticate with the highest privileged account and spider/discover as many objects and pages as possible. Don’t forget to use intruder to search for hidden directories as well as convert POST requests to GET which can also be used to access additional resources (if allowed by the server of course).
- In the sitemap right click on the host at the correct path and select ‘Copy URLs in this branch.’ This will give you a list of resources which were accessed by the high privileged account.

- Logout and clear any saved session information.
- Login with a lower privileged user which could also be a user with no credentials or user role at all. Be sure you have an active session with this user.
- Open the Burp Importer tab and paste the list of resources retrieved from the higher privileged account into the URL List box. Select the ‘Enable: Follow Redirects’ box as it helps you know if you are being redirected to a login or error page.
- Analyze the results! A list of ‘failed’ connections and the number of redirects will automatically be added to the Log box. These are a good indicator if the lower privileged session was able to access the resources or if they were just redirected to a login/error page. The sitemap should also be searched to manually verify if any unauthorized resources were indeed successfully accessed. Entire branches of responses can be searched using regex and a negative match for the ‘Location’ header to find valid connections.

Here we can see the requests made to the DVWA application while logged in as 'admin' were not able to connect and redirected to the login page after the original administrative session was logged out of and killed. During this use case the DVWA application was not vulnerable to insecure direct object references.
There are many other uses for this extension just use your imagination! If you come up with any cool ideas or have any comments please reach out to me.


